
By Sam Smith
June 22nd 2023
Ready to take on the mission of transporting your shed to your new home? Buckle up – it’s going to be quite a ride! Be prepared to pull out the tape measure, put the hard hat on, and get strategising.
It’s time to get your shed to your new home.
Let’s roll!
Equipment and Supplies needed
- Measuring tape
- Flatbed truck or trailer bed (if the shed is under 6″ long)
- Trailer bed (if the shed exceeds 8″ long)
- Forklift (if the shed weighs less than a tonne)
- Licensed forklift operator (if using a forklift)
- Tools for dismantling the shed (if needed)
- Shovel
- Rake
- Level
- Tape measure
- Wheelbarrow
- Wooden boards for formwork (if using a concrete slab foundation)
- Concrete (if using a concrete slab foundation)
- Gravel (if using a gravel pad foundation)
- Pressure-treated wood beams or concrete deck blocks (if using a post-and-beam framework foundation)
- Tamper or mechanical compactor (if using a gravel pad foundation)
- Straps, braces, or chains for securing the shed
- Pry bar
- Hammer
- Screwdriver
- Pliers
- Reciprocating saw or circular saw
- Ladder
- Safety gloves
- Safety goggles
- Utility knife
- Packing materials for fragile items
- Boxes for packing and labeling shed contents
- Vehicle for transporting the shed
- Professional movers and operators (optional)
Step 1: Decide if you should move the shed
You love your shed.
You either paid a lot for it or you inherited from a close relative.
But is it worth moving?
Sometimes, the cost of dismantling and moving outweighs the investment. We’ve seen cases where it’s cheaper to buy a new shed then transport across the nation.
So, let’s breathe before jump in to moving this shed. Here are 4 factors to help you decide:
Assess the shed’s condition
Check for any signs of rot, damage or wear and tear. If the shed is in poor condition, it may not be worth the cost and effort of moving it. It may break during transport or just after. Imagine all that effort just to dispose of it.
Measure the size of the shed.
Don’t want or can’t dismantle your shed?
You’ve got 4 options when to comes to transporting it:
Under 6″ long? It can snugly fit into a long, average-sized flatbed truck. Plus, you and your pals can lift it up – no fancy equipment needed. Just measure your shed and find the perfect truck bed match.
Weigh over a tonne? Upgrade to a trailer bed. If you’re shed exceeds 8″ long, it’ll give it enough space to travel too.
Lighter than a tonne? Got a half-tonne shed? Forklift prongs to the rescue! But hold up – you’ll need some experience for this one. Better yet, enlist a licensed forklift operator to ensure a smooth and safe move.
Want to fit in the back of a moving truck? If your shed allows for it, taking it apart could be your ticket to a successful move. So, grab those tools and get to work before hitting the road!
Cemented to the ground? If your shed is cemented into the ground, you might have to it break up. But hey, a new home calls for a fresh start, so why not invest in a brand-new shed?
Consider the cost of transporting
Think about the distance between the old and new location. Moving a shed across town will be less expensive than moving it across the country. If the distance is too far, it may not be worth the cost of transportation. If the shed has sentimental value or is a family heirloom, it may be worth the extra effort and cost to move it to the new location. Otherwise, you may as well buy a new shed.
Does your new home have the proper foundations?
Check if the new site has a suitable foundation for the shed. If the shed was initially built on a specific type of foundation (e.g., concrete slab or gravel pad), ensure the new location can accommodate the same type or make necessary adjustments. The last discovery you want when arriving at your new home is to find you can place your shed anywhere.
Step 2: Strategise Your Shed’s Big Move
When planning your house move, consider these factors for your shed:
Accessibility
Evaluate the accessibility of the current location and the new site. Ensure there is sufficient space for manoeuvring the shed during the moving process, including clear pathways and overhead clearance.
Disassembly and reassembly
If the shed needs to be taken apart for relocation, consider the effort and skill required for disassembly and reassembly. Take detailed photographs or create labeled diagrams to help with the reassembly process.
Path of travel
Plan the path of travel for moving the shed from the current location to the new site. Consider obstacles such as trees, fences, power lines, or other structures that may obstruct the movement. Clear the path as necessary.
Equipment and manpower
Determine the equipment and manpower needed for the shed move. Depending on the shed’s size and weight, you may require a truck, trailer, forklift, or a crane to safely transport and position the shed.
Weather conditions
Choose a suitable time to move the shed, taking into account weather conditions. Avoid moving the shed during periods of heavy rain, snow, or strong winds, as these can pose risks and complicate the process.
Utility disconnection
If the shed is connected to utilities such as electricity, water, or gas, ensure that these connections are properly disconnected before moving. Seek professional assistance if necessary to handle utility disconnection and reconnection.
Cost considerations
Assess the overall cost involved in moving the shed, including equipment rental, labor, permits, and any required modifications to the shed or new foundation. Compare these costs with the value and condition of the shed to determine if moving it is a cost-effective option.
Having a game-plan to overcome challenges will make sure your home move goes smooth.
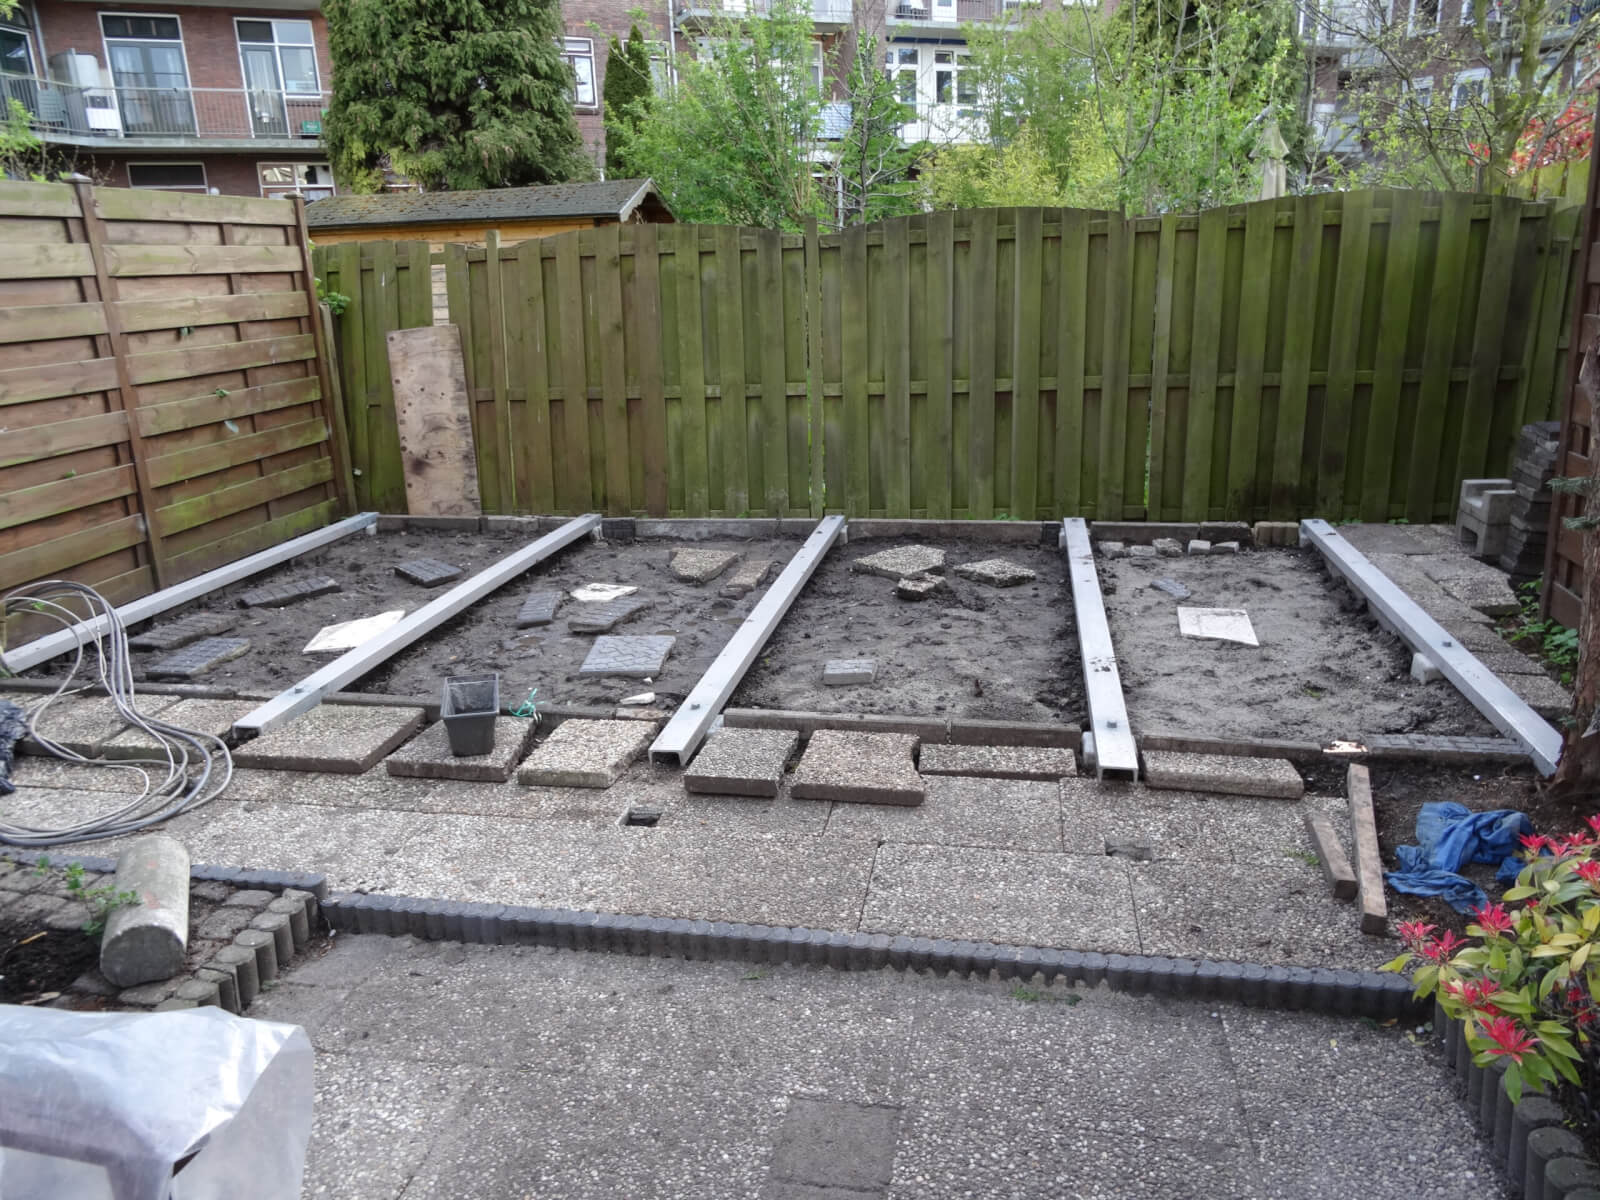
Step 3: Create a solid foundation for your shed
Let’s start at the new house.
Before digging and installing a new foundation, make sure to check there’s not utility lines below. Cutting off supply for your neighbour is not the best first impression.
Create a solid foundation by following these simple steps:
- Determine the shed’s location: Choose a suitable area for your shed that is level, well-drained, and provides easy access.
- Choose the foundation type: Different types of shed foundations include concrete slabs, gravel pads, and post-and-beam frameworks. Consider factors such as cost, durability, local climate, and personal preference when deciding which foundation type suits your needs.
- Gather the necessary tools and materials: You will typically need tools such as a shovel, rake, level, tape measure, and a wheelbarrow. The materials required depend on the type of foundation you choose, which could include concrete, gravel, or pressure-treated wood.
- Excavate the area: Prepare the ground by removing any vegetation, rocks, or debris from the shed’s footprint. Use a shovel or other digging tools to level the area, ensuring it is slightly larger than the shed’s dimensions.
- Level the site: Use a rake, shovel, and a level to ensure the site is perfectly level. A level foundation is crucial to prevent structural issues with the shed in the future.
- Install the foundation: Depending on your chosen foundation type, follow these steps:
- Concrete slab: Build a formwork using wooden boards around the shed’s footprint. Mix and pour concrete into the formwork, levelling and smoothing the surface. Allow it to cure according to the manufacturer’s instructions.
- Gravel pad: Fill the excavated area with a layer of crushed gravel. Compact the gravel using a tamper or mechanical compactor until it is firm and level.
- Post-and-beam framework: Install pressure-treated wood beams or concrete deck blocks at regular intervals to support the shed’s floor. Ensure the beams are level and properly aligned.
- Allow for drainage: Regardless of the foundation type, ensure proper drainage around the shed. This can be achieved by sloping the ground away from the shed or incorporating a French drain system if necessary.
- Let the foundation settle: Give the foundation time to settle and cure if using concrete. Follow the recommended curing time before proceeding with the shed construction.
Now, we can return to your existing home to pack the shed.

Step 4: Empty and secure the shed
Remove all contents.
Begin by emptying the shed of all its contents. Take out tools, equipment, stored items, and any other belongings.
Sort and organise these items as you remove them.
Clean and declutter the interior
Sweep or vacuum the floor, remove any dust or cobwebs, and wipe down surfaces as needed. Discard any unnecessary items or consider donating or selling items that you no longer need.
Pack and label items.
If you’re moving the shed to a new location, carefully pack and label the items for transport. Use appropriate packing materials to protect fragile items. Clearly mark boxes or containers with their contents to make unpacking easier later.
Secure doors and windows.
Ensure that all doors and windows are securely closed and locked. If the shed has any vulnerable points, such as broken or weak locks, repair or replace them to enhance security.
Check for structural integrity.
Before securing the shed, inspect the structure for any signs of damage or wear. Address any issues promptly, such as repairing or reinforcing weak spots, loose boards, or damaged roofing.
Step 5 (Option A): Lift and support onto a flatbed truck
Dismantling instead? Skip this section.
Lifting and supporting a shed onto a flatbed truck or trailer bed requires careful planning and proper equipment.
Here are instructions to guide you through the process:
Note: It is highly recommended to seek professional assistance or hire experienced shed movers for this task, as it can be complex and potentially dangerous. They have the expertise and specialised equipment to handle the job safely and efficiently.
- Gather necessary equipment: Acquire the appropriate equipment to safely lift and support the shed. This may include a forklift, crane, hydraulic jack, straps, braces, and sturdy wooden beams.
- Prepare the flatbed truck or trailer: Ensure the flatbed truck or trailer bed is clean, stable, and in good condition. Clear any debris or obstacles that could hinder the shed’s placement.
- Plan the lift: Determine the best approach for lifting the shed. This could involve using a forklift, crane, or a combination of manual labor and lifting equipment. Ensure the lifting method aligns with the shed’s weight and size.
- Secure the lifting equipment: Attach lifting straps or cables to the shed securely. Place the straps or cables in strategic locations to evenly distribute the weight and prevent damage to the shed’s structure.
- Lift the shed: Use the chosen lifting equipment to gradually and carefully lift the shed off the ground. Follow the manufacturer’s guidelines and safety instructions for the specific lifting equipment being used. Coordinate with the team members involved in the process to ensure smooth and controlled lifting.
- Position the flatbed truck or trailer: Position the flatbed truck or trailer bed in a convenient location, ensuring stability and sufficient space for the shed. Use levelling equipment if necessary to ensure the bed is flat and even.
- Lower the shed onto the flatbed: Slowly and gently lower the shed onto the flatbed truck or trailer bed. Make sure the shed is aligned with the bed and centred properly. Avoid sudden movements or dropping the shed, as this can cause damage.
- Secure the shed: Once the shed is placed on the flatbed, secure it to prevent shifting or movement during transportation. Use straps, braces, or chains to anchor the shed firmly to the truck or trailer bed. Ensure the securing devices are tightened and provide sufficient support.
- Inspect and double-check: Before moving the shed, perform a thorough inspection of the setup. Ensure all connections, straps, and braces are secure and properly tightened. Double-check that the shed is positioned evenly on the flatbed and is stable.
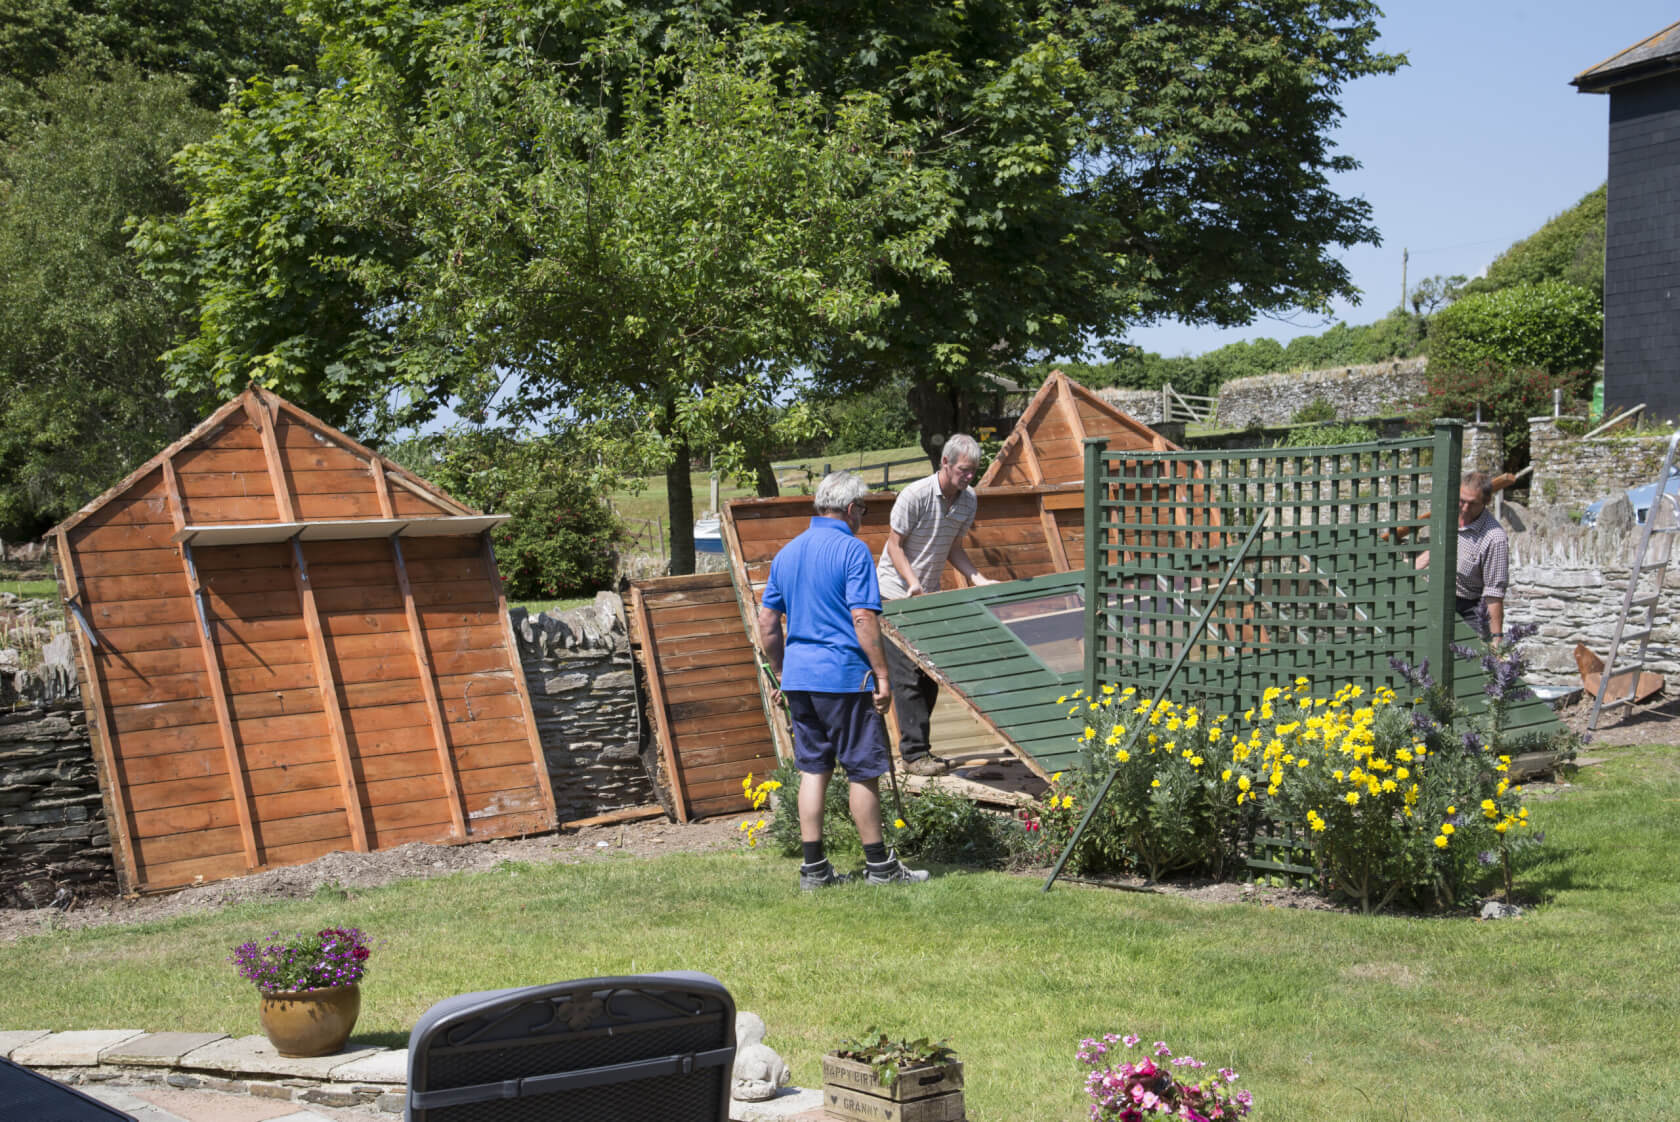
Step 5 (Option B): Dismantle the shed
Here’s a handy guide to shed dismantling, but don’t forget to check your manufacturer’s instructions for the best method!
- Prepare and gather tools: Before starting, gather the necessary tools and equipment for the dismantling process. These may include a pry bar, hammer, screwdriver, pliers, reciprocating saw or circular saw, ladder, safety gloves, safety goggles, and a utility knife.
- Document or photograph the shed: Take detailed photographs or create labeled diagrams of the shed’s current configuration. This will serve as a reference during reassembly.
- Start with the roof: Begin by removing the roof of the shed. If the shed has shingles or a metal roof, carefully pry them off one by one using a pry bar or hammer. If it has a flat roof, unscrew or pry off the panels or boards covering the roof structure.
- Remove doors and windows: Take out any doors and windows from the shed. Unscrew hinges, remove screws, or pry them loose. Set aside the hardware for later use or replacement.
- Disassemble the walls: Starting from one end, carefully remove the siding, panels, or cladding of the shed. Use a pry bar or hammer to loosen nails, screws, or fasteners holding the wall materials in place. Work your way around the shed, systematically removing each wall section.
- Remove the floor and framing (if applicable): If the shed has a floor or a raised platform, disassemble it next. Remove the flooring panels, floor joists, and any supporting beams. Unscrew or pry apart the connections. Be cautious when working with any weight-bearing elements to maintain stability.
- Dismantle the remaining structure: Once the walls and floor are removed, disassemble any remaining structural elements, such as beams, rafters, or posts. Use appropriate tools to unscrew or pry apart the connections. Take care not to damage any reusable materials.
- Sort and organise components: As you dismantle the shed, sort and organise the components based on their type and condition. Separate salvageable materials, such as lumber or hardware, from items that need to be discarded.
- Properly dispose of debris: Dispose of any debris, damaged materials, or unwanted components responsibly. Check local regulations for appropriate disposal methods, such as recycling or waste management facilities.
- Preserve salvaged materials: If you plan to reuse salvaged materials for future projects or shed reassembly, store them in a dry and protected area. Keep hardware, screws, and small parts in labeled containers for easy retrieval
Step 6: Transport the shed
Hop in the vehicle and slowly move the shed to it’s new location. If you’re looking to ensure maximum protection for your beloved shed while relocating, it’s highly recommended to enlist the help of professional movers and operators. Their expertise and equipment can make the process a breeze and give you peace of mind, knowing your shed is in safe hands.
Step 7: Unload your shed onto the foundation
Once at the new location, gently lower the shed onto its prepared foundation and secure it in place. Check the shed for any damage after the move and then enjoy your newly relocated garden shed!
Now, it’s time for a cuppa – and then the rest of the house!
FAQs
How many people do I need to move a shed?
Assess the size and weight of your shed. A small, lightweight shed might only require two strapping individuals, while a larger, heavier shed could demand the brawn of four or more.
How long does it take to move a shed?
A small, simple shed may only take a few hours to move, while a larger, more intricate one could require a full day, or even a weekend of dedication. Rule of thumb: the bigger the shed, the more time you’ll need.
Can I move a shed with contents inside?
While it may seem like a time-saving idea, moving a shed with the contents inside is a risky business. Not only can it cause damage to your precious belongings, but it can also compromise the structural integrity of your shed during the move.
It’s best to move a shed empty. For everyone’s sake.